


In this episode of Drive Radio – The Extra Mile, John Rush continues his two-part series on trailer towing, focusing on what happens after you’ve chosen the right setup.
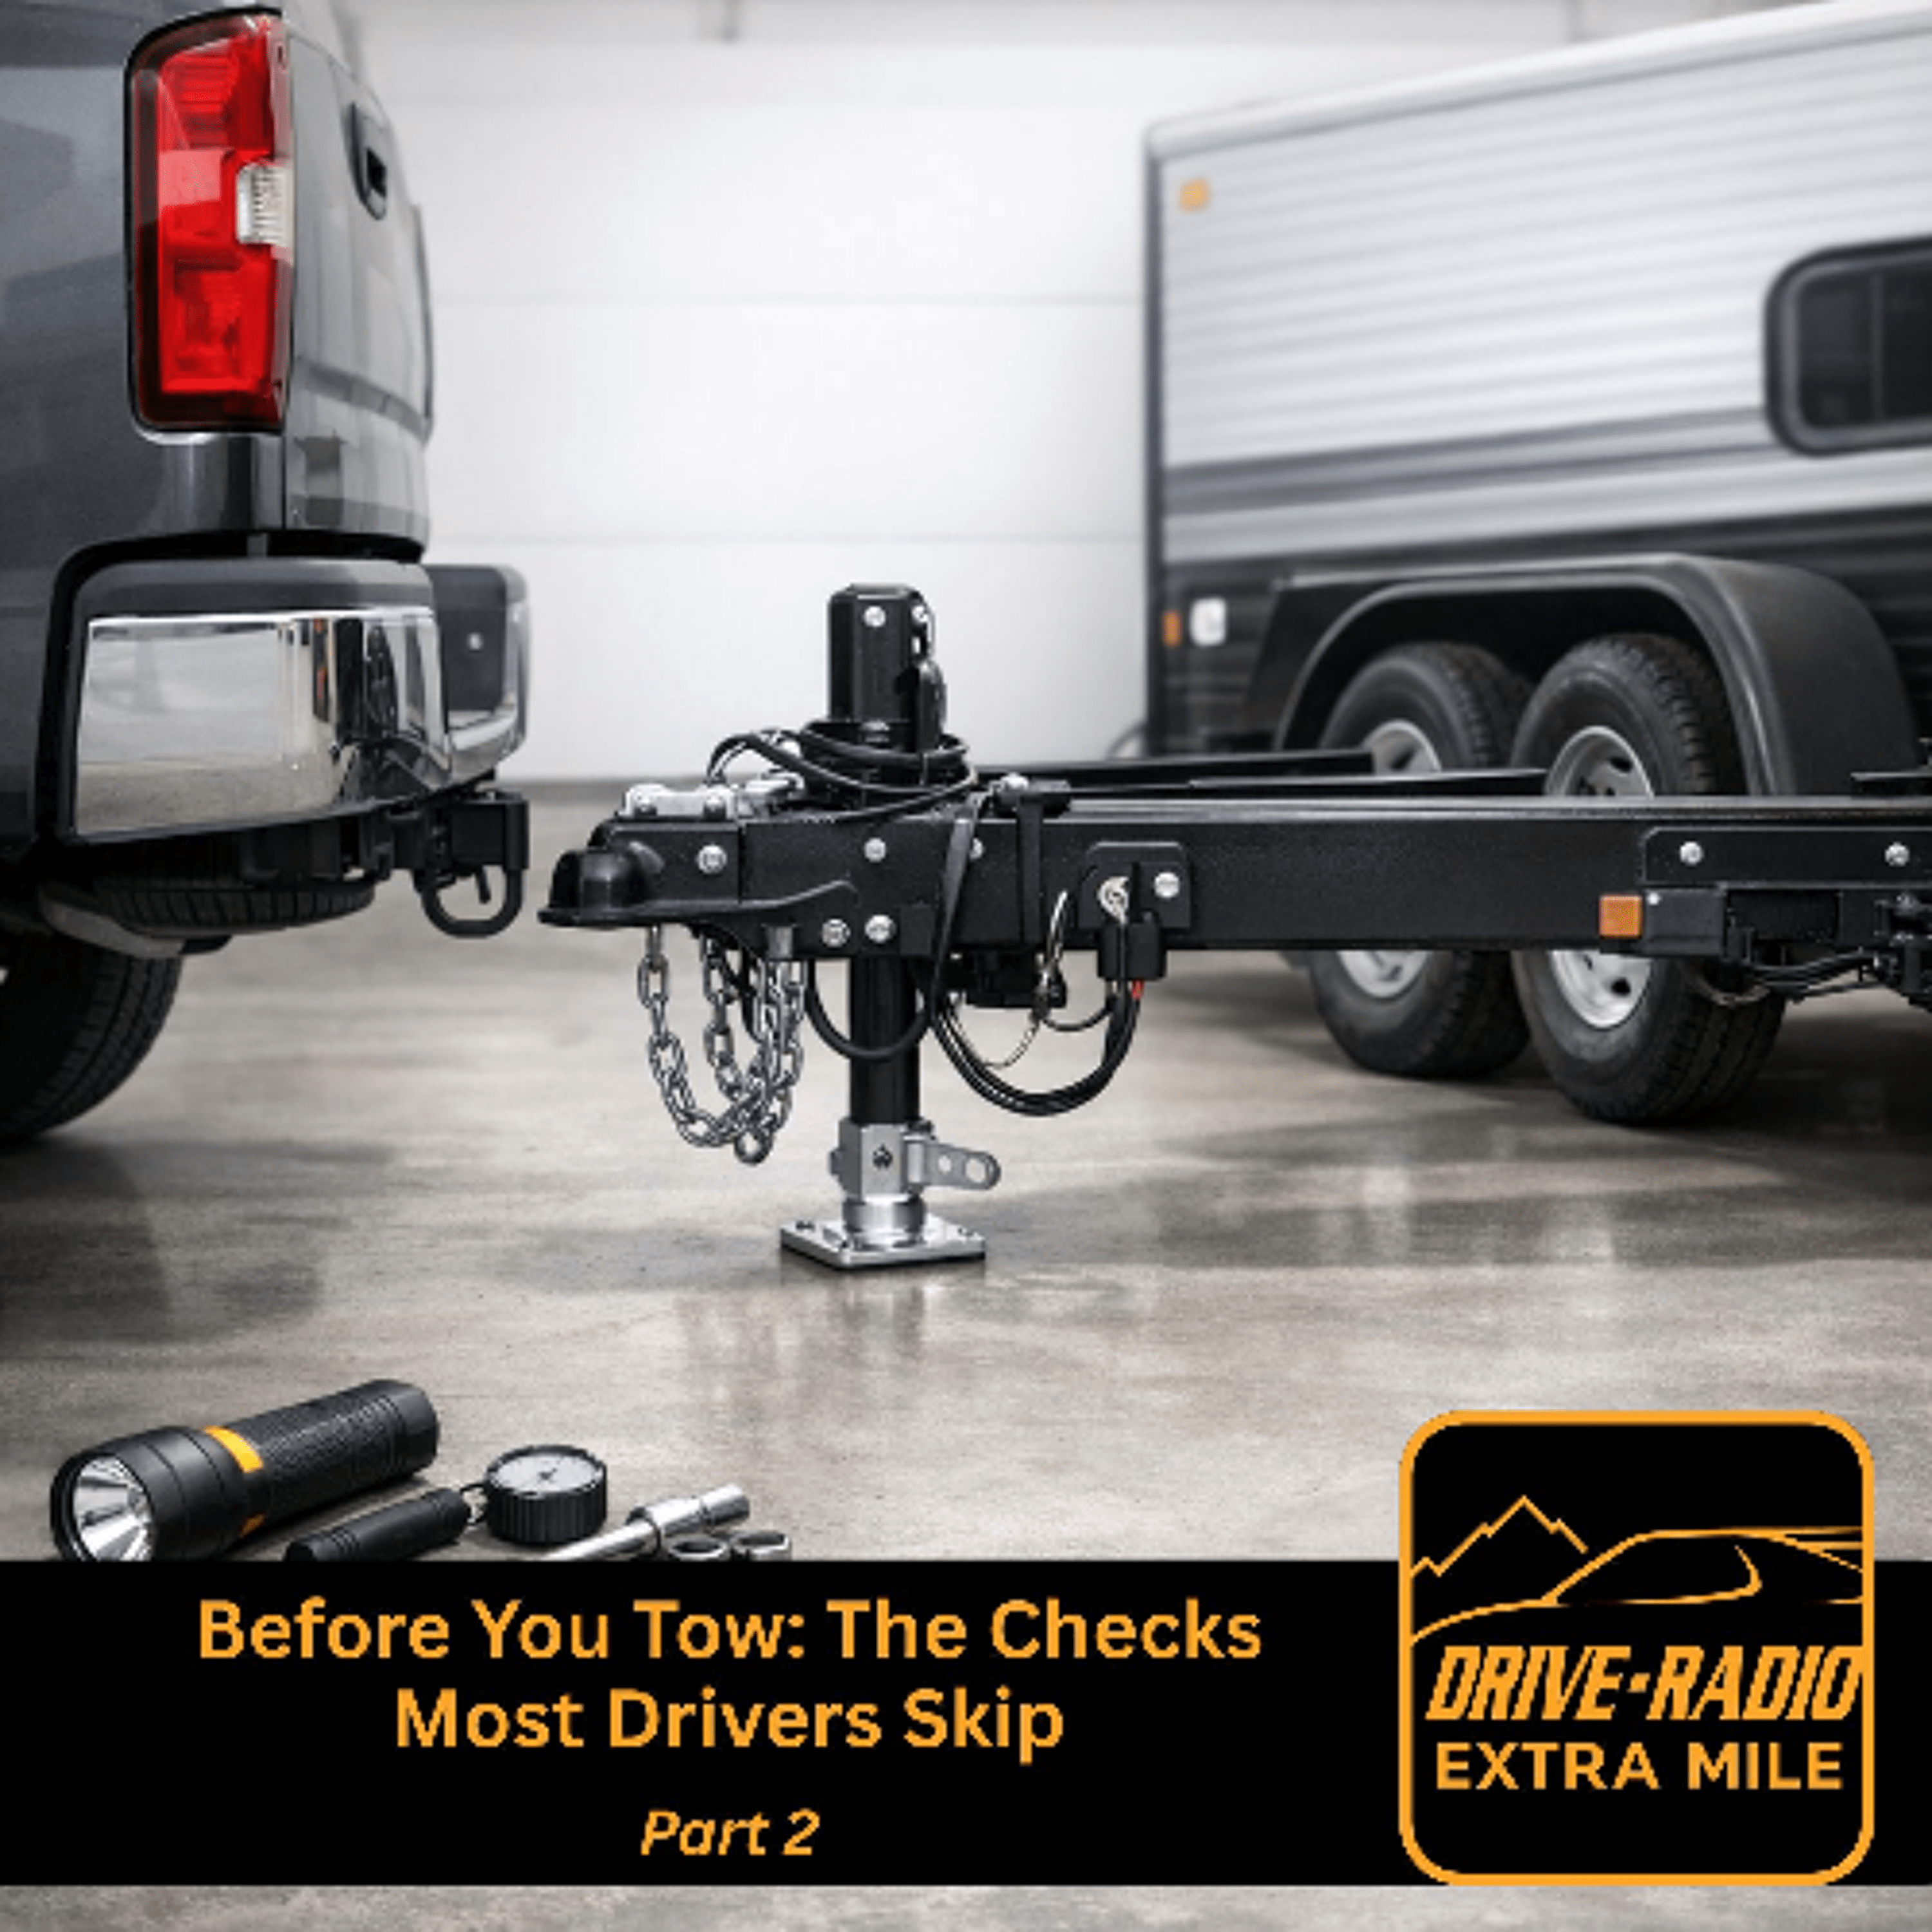
This episode walks through the critical pre-trip inspection process—from checking tire pressure and lug nuts to inspecting wiring, lights, and brake systems. John explains how to properly hook up a trailer, including coupler alignment, safety chains, and breakaway systems—highlighting common mistakes that can lead to dangerous situations on the road.
The conversation also dives into ongoing maintenance, including wheel bearings, trailer brakes, suspension components, and RV systems. Whether you’re towing a camper,
SPEAKER 06 :
This is Drive Radio, The Extra Mile, with your host, John Rush.
SPEAKER 02 :
Welcome back. Another edition of Drive Radio, The Extra Mile. Luke Cashman, of course, my producer, engineer today. And Luke, how are you today?
SPEAKER 03 :
I’m doing all right, John. I’m doing all right. How are you?
SPEAKER 02 :
I’m very good. It’s good to hear from you. And I get lots of comments on folks that enjoy Luke chiming in. So I appreciate that, Luke. And I had several positive comments of that. And for those of you listening this week, we did sort of a… I guess you could call this a two-parter. We did part one last week on the Extra Mile talking about just trailer towing, having the right rig, how does that all look, how do you know exactly what you should even be hauling, you know, as far as the tow vehicle and the trailer goes. So I covered all of that last week. If you’re listening to this week as maybe your first episode… Of the Extra Mile, we do this every Saturday from 3 to 4 p.m., and there’s repeats as well. So if you’re listening to this episode and you want to know more about, well, wait a minute, I want to know what I should even have as a setup is concerned. You know, what’s my tow rig supposed to be like? How do I figure those things and so on? We did all of that in Part 1. So Luke and I did that last week. So if you want to listen to Part 1, go to drive-radio.com. That’s drive-radio.com. And the Extra Mile has its own link. You just click on the button up above on the website, and you’ll notice a drop-down menu. And once you click on the Extra Mile, you’ll see all the different episodes that we have done. So if you just look for the episode prior to this one, so last week, that would have been, just so you all know the dates. Let me get you the dates. I apologize. Look for the 21st. march the 21st if you want to listen to part one that’s what you do now part two today and this was by the way a topic that was requested by you all and i’ve got a request coming up that i probably will cover on monday that sort of coincides with this and somebody wants me to break down the door sticker that’s on the door frame of the majority of vehicles all modern vehicles it’s there and And by the way, that’s a great topic and one that I will cover. I believe we’ll do that for the next episode, which also ties into what we’re talking about. Because when some people say, well, how do I know if I have the right vehicle to even haul with? That door sticker gives you all of your GVWR ratings, what the front axle, rear axle, what you can haul and so on. That’s all in that door sticker. I’ll break that down for the next episode. But today I want to talk about, again, continuing on with our whole trailer thing. And yeah, we’re getting in that time of the year where Memorial Day is not that far off. Some folks will even take some time and do some things potentially over the end of spring break, which some are still going on. Our mountains have not had a lot of snow. So believe it or not, there’s going to be a lot of campgrounds and things like that that will be open most likely early rather than late. In some cases, campgrounds can’t get open because they’re full of snow and so on. Not going to be the case this year. If there’s not a campground open by Memorial Day, I can tell you this, unless we get some late snow, which we could, but unless we get late snow, it’s not going to be shut down because of snow. That one I can pretty much guarantee you. So a lot of you will be going out doing different things. Some of you may be even looking at buying things. You know, RVs and trailers. And again, I covered a lot of that in episode one. But let’s let’s say you already own one. You you’ve bought the vehicle or you’ve bought the trailer. And I’m going to separate this out. I’m going to start with trailers first and then I’ll get into RV maintenance as well. Now, one thing that today that I may brush on that I most likely won’t get into a lot of detail is the inside maintenance of your RV. There’s a lot going on in lots of different configurations. And what I mean by that is you guys have water pumps that pump water to your faucets and, in some cases, a wet toilet and shower and so on. You’ve got hot water heaters. Some of those are done electrically. Some of those are done by natural gas or propane, propane mainly. And again, lots of even fridges. Fridges can run off of electricity or in some cases off of natural gas or, sorry, off of propane as well. I keep wanting to say natural gas. I get it. It’s propane. Gas. Let’s just say it that way. And I’m not going to get into a lot of those things because every – RV, every one of those units inside of the RV are all done a little differently. I know in some cases they’re very similar, but I’m not going to get into maintenance on what you need to do with your fridge or your hot water heater and your water heater, I should say, and things like that. I’m going to cover more of the mechanical maintenance just to make sure that we can get from A to B safely. And what you do as far as the rest of the RV is concerned and how you maintain it, that one I’m going to leave up to you because there’s different facets across the board on all of those. Some bigger fifth wheels and RVs will even have regular residential-type refrigerators and things in them. So not going to cover any of that today because every one of those is going to be different. So… on every let’s start with a towable trailer whether this be fifth wheel whether it be a toy hauler you know bumper pull whether it be just a regular rv or if you’re just hauling a utility trailer okay flatbed trailer car trailer and so on and and again there are gosh luke a plethora of different trailers out there. I mean, just look around at all the different things that are made, from small enclosed cargo trailers, dump trailers, small utility trailers, flatbed trailers for hauling all sorts of stuff, car trailers, equipment trailers. Again, I talked last week about gooseneck and fifth wheels and so on. Guys, there’s a gazillion of. Now, all that being said, guess what? Your initial walk-around of whatever it is you’re going to be towing doesn’t change. Our walk-around, and what I’m going to get into right now, it’s going to be the same no matter what you’re towing. So this first segment today, I’m going to get into literally what are you going to walk around and look at on that particular unit. Now, I’m one that says you should do a walk-around of the trailer even before you hook up to it. Okay, now, if it’s something that you’re hauling on a pretty routine basis and you just hauled it yesterday, okay, the walk around of the trailer not hooked up is probably not as big of a deal. Although I still think there’s nothing wrong with taking 30 seconds and just quickly, you know, walking around the trailer while it’s unhooked. And here’s what I want you to do. First of all, we’re going to look at tires. Pressures. Check them. I don’t care that you just hauled it yesterday. Go ahead and check tire pressures. Things could have changed. Something could have changed even in the haul of what you did yesterday, for example. And the other thing, too, that no one ever does, and this is something that, you know, do you need to do it on a daily basis if you’re hauling a trailer daily? No, probably not. But if you’re hauling periodically… Checking lug nut torque, very important. Things can change from season to season, and torquing the lug nuts properly is something that, yes indeed, you should be looking at. And again, that can be done hooked up or not. Again, just depends on what your storage is like and where you’re hauling the trailer from. Some of you have storage on site. Some of you are paying to store a trailer. Some of it might be in your business. It just depends on how you’re doing things. But again, we’re going to look at tires, number one. And this is especially true for this time of year where you may be getting the trailer out for the first time. Let’s walk around and we’re going to look at tires. We want to make sure that they’re full up to their pressure, you know, up to the specs for pressure and physically look at each tire. Have they been in the sun? Are they weather checked? What’s the tread look like? Is there any irregular wear on them? And by the way, it’s a good idea to have a flashlight even in the brightest of day. Sometimes seeing up inside of the wheel well and so on, you cannot do without a flashlight. So make sure you’ve got a flashlight. Even on, again, really bright days, you’ll get shadows and things like that, and it becomes very difficult to see. Make sure you can see everything. Bring a flashlight for this particular walk around. By the way, if you’re going to tow anything, you should have a flashlight in your – center console, glove box, under the seat, whatever, that should be something that is standard when you’re towing a trailer, period. In fact, there’s two things I think everybody should have when towing a trailer. Some sort of penetrating lubricant, oil, whatever you want to call it, WD-40 even works fine, and a flashlight. Why? Because both of those things will come in very handy when you’re towing something. One, to keep things lubricated. Two, so you can see what you’re doing. Sometimes you’re hooking up at night and it’s dark. Sometimes you’re checking things like I just mentioned, and it could be broad daylight. But we’re going to take a walk around. We’re going to look at all the tires, okay? On top of that, let’s look at everything else on the trailer. Marker lamps. Did anything get knocked off the last time you towed it? Did you rub up against something and you didn’t even know it? Did something rub up against you, by the way? We want to look at marker lamps, running lamps, and, of course, taillights. This is really true, especially for utility trailers, flatbed trailers. Things that you’re hauling could have come loose, could have even knocked a light loose, things like that. We want to physically make sure that everything on the trailer is intact. especially for some of you where, again, you may have stored the trailer all winter long. Something else I want you to look at for those of you that have stored the trailer all winter, get your flashlight and let’s look at anything that potentially could be exposed that rodents could have actually got onto and chewed. So look at those pigtails for the wires that are coming out of the lights and going into the frame. Look up at the front to see where your plug is and so on. Let’s make sure that everything looks good, nothing’s been chewed, nothing’s been disturbed, and so on. But the main thing on the tires is we want to make sure they’re in really good shape. They’re pressured up. You don’t have any weather checking and so on. Now, really quick tip on tires. This is especially true for those of you that either park the vehicle and it has to sit outside. You don’t have a shed or anything to put the trailer in or under. They make really inexpensive tire covers. They’re just slip over covers. I use them on some of my trailers. And what that does is cuts down on that sun damage weather checking that you can get on a tire, knowing that you’re never going to wear the tire out. In certain cases, the little bit that you might tow that trailer, you’ll never wear the tire out. But it over time will go bad from the weather checking. Keep them covered. It helps immensely. Now, if you’re poor, which a lot of us are. and you can’t afford to actually go buy a cover, trash bags work very well also. They can easily be adapted and just tied around the tire. Anything you can do to keep the sun off of that tire, keep the UV rays off of that tire from getting into the rubber and weather checking it, anything along those lines would be useful. Next thing we’re going to check is our coupler and our hitch. Looking for, is there any crack? Again, this is where a flashlight comes in handy. Do we have any cracks in the frame along where the coupler matches up? Does the coupler look good? Look up inside the coupler. I’ve seen couplers literally, because of lack of lubricant, wear clear through and have the ball come all the way through the ball mount. or the ball hitch area is what I should say, the round portion where the trailer coupler fits on top of the ball. I literally have seen trailers towed enough and not had any lubrication and have literally seen those wear all the way through and or notice there’s cracks and things that happen in that ball area. So, again, double-checking, making sure that we’re looking at all of those things. We want to check our safety chains. Are they attached to the frame properly? Again, where are they attached? Most of the time, there’ll be a welded type hook assembly that somebody, you know, the manufacturer welded onto the frame of the trailer. Sometimes they’re bolted on. How does all of that look? Is all of that good and tight? In other words, if the trailer were to come off, are our chains going to be adequate? OK, so we talked about chains and how to hook them up properly last week in episode one. Now I want you to look at these and make sure that everything in this walk around, they are on there correctly. They look good. And here’s another thing. And I didn’t talk about this last week. I should address this today. I’ve seen trailers over the years where somehow, some way there’s only one safety chain and people think that’s enough. It’s not. One other thing I didn’t mention last week, and this is key here, and I’m going to get into this, especially after we get the trailer hooked up. For those that have electric brakes, which most of your heavier trailers, car trailers, and so on will have, there is what we call a breakaway switch that is built onto the braking system. And what it is is it’s a switch. We call it a switch, but it’s essentially a plunger. with a wire, little wire rope, very thin, about an eighth inch thick, that’s attached to the end of the plunger. And if things ever become separated, and you see videos and things of this where a trailer comes completely off of a truck, for example, if it’s got this device on it, which they should have, in most states it’s mandated, When that plunger comes out, the brakes are energized fully off of a built-in backup battery that’s usually mounted to the frame of the trailer. And I can’t tell you how many of those over the years I see go bad. The battery itself is dead. The switch doesn’t work properly. Bottom line, if things were to come apart, the trailer is going to keep rolling along. The brakes never get activated. And it’s a safety issue. So part of what I want you to look at as we’re doing this walk around is if you have electric brakes, is all of that functioning properly? Now, beginning of the year, especially now that you’re dragging this trailer out for the first time, I want you with a voltmeter. And by the way, if you’re somebody that tows at all and does anything, you should have a voltmeter. They’re cheap. You can get them pretty much anywhere you want. They’re not very expensive. You can get a digital voltmeter anymore for under 20 bucks. We’re not talking about a lot of money. And the reason why I want you to use a meter is I want you to take the lid off of this battery, and I want you to know exactly how much voltage is in that backup battery. Does it have 12.8 to 13 volts? If not, it needs replaced. If you start dropping below that… That battery is no good. It’s not going to energize the brakes. If that plunger is somehow, you know, the trailer comes disconnected and that plunger comes out, and I’ll talk about how to hook that up in a moment properly, which I didn’t do last week. We sort of ran, literally Luke and I were running out of time on last week’s episode. That’s why we’re doing number two this week. Second part, I should say. So, yes, we want to make sure that that… It’s called a breakaway switch, breakaway system. So if the trailer ever breaks away from the truck, that cable is energized, pulled, if you would. That plunger comes out. That battery then becomes engaged, and the trailer brakes are now on fully, meaning those are going to, for the most part, lock up. And whatever’s on that trailer, it’s going to slow down, hopefully in a straight line. If everything is working properly on the brakes, which I’ll get to that here in just one moment. So that’s our initial walk around. We want to make sure that everything is working properly. We don’t have any cracks anywhere. No problems. Brakes look or tires look good. All of that is good to go. And by the way, as you’re looking at the tires, look at the suspension as well. And in some cases, there’s some lubrication points. I’m going to get into that here in just one moment. To me, that’s more of what you do once things are hooked up. So let’s do this. We’ve now looked at everything as far as the trailer itself goes. We can now hook up. We’re going to come back and talk about that here in a second part. We have three parts that I do when it comes to the extra mile. So hang tight. We’re going to do part two here in just one moment. You’re listening to Drive Radio The Extra Mile right here on KLZ 560.
SPEAKER 05 :
The friendly folks at your local Napa Auto Care Center appreciate their customers and they like to show it. Stop by your Napa Auto Care Center today and ask for your customer loyalty card. It has a valuable offer you can use again and again. It’s their way of thanking you again and again for your business and loyalty. Find your nearest store at NapaOnline.com.
SPEAKER 04 :
Looking for the right car at the right price? Ridgeline Auto Brokers makes it easy. They specialize in quality vehicles priced between $15,000 and $25,000, perfect for first-time drivers, families, or anyone who wants real value without the hassle. Every vehicle is thoroughly inspected by Legacy Automotive, a trusted drive radio sponsor. That means you can buy with confidence, knowing your next ride is ready for the road. No dealer fees, competitive financing, and trades are welcomed. A 30-day warranty on every vehicle and your first oil change is just $1. Explore detailed videos of every car at RidgelineAutobrokers.com before you visit. Ridgeline also has a great consignment program to assist you in the sale of your car, truck, or SUV. So if you’re ready to buy, trade, or sell your vehicle, call 303-442-4141 or visit RidgelineAutobrokers.com. Ridgeline Auto Brokers, the right car, the right price, right now.
SPEAKER 06 :
This program was recorded earlier for broadcast at this time. No phone calls can be accepted.
SPEAKER 02 :
Welcome back. Drive Radio, The Extra Mile, heard every Saturday right here on KLZ 563 to 4 p.m. This is part two of trailer towing, and I’m going to try to work RVs into this. If we don’t, we’ll do a part three. I promise. This is a request that had come in a few weeks ago. From several of you, by the way, not just one person requested this. I had several requests to, hey, talk about trailer towing, RV maintenance and so on, because it doesn’t get talked about enough. And there’s so much misinformation out there. Would you cover this? And I said, sure, I would be more than happy to. So, again, we have done the walk around on the trailer. We’re ready to hook up. Now, here’s a few things on hooking up. Now, let me give you a few tips. Now, with backup cameras and stuff on the majority of vehicles when it comes to hooking up a trailer, they make that pretty easy. You can typically see the ball in the backup camera, and you can typically back right up and load the trailer, and it becomes very easy. Now, let me give you a few tips if you don’t have that. Some of us, myself included, have older vehicles where there’s no backup camera. And you’re doing this the old-fashioned way. So here’s what I’ve always done to hook up the trailer and try to get it in the first notch, especially if you’re by yourself and there’s nobody there to guide you. You pretty much know where the center line of your bed is. If you don’t, you know, take something that, of course, would come off, a piece of chalk or something that would come off, and mark the center of the bed, if you would, with a piece of chalk, so as you’re backing up, you can see that center. meaning that’s the center of the truck. You can look in your mirrors as you’re backing up, and you pretty much know I’ve got the trailer now centered with that mark I just put in. You can do all this, by the way, as you’re backing up with your mirrors. You don’t even have to look behind you. All of this can be done in your mirrors. And what you do is you get that lined up. You pretty much know where the middle of the trailer is, and you pretty much know what your distance is. If you do this enough, you pretty much know how far away from the trailer you are. And what I do is I start backing up. I know roughly where I’m going to be with my ball relation to the trailer. And when I know I’m within about a foot or so, I stop. And yes, you have to put it in park and get out. Now, as I get out and I go back and look, if I’m straight, I know I’m good to go. If I know that I’m off a little bit, I know which way I need to turn the steering wheel to get lined up, and I’m good to go. Bottom line, you’re going to be pretty close with what I just gave you as a tip. And by the way, you can do this even with a backup camera because it makes it pretty fast. I mean, I can typically hook up a trailer, no backup camera, lickety-split, don’t need any help. I can do this with climbing in and out one time, not a problem. And here’s the tip on how you do this as to how, okay, John, fine, you’re all lined up. Now how far do you back up? Not till you hit, by the way. That’s too far. And if you’ve got things a little bit misaligned, you could run the trailer into the back of the truck and we don’t want that. That causes damage and scratches and so on. And no, we don’t want to do that. So here’s what I do. And this is really a pretty simple way to do it. And I don’t know who taught me this. I think it’s just something I just picked up along the way. If you know your distance is roughly a foot. And in a lot of cases, you hook up a trailer in dirt. I know sometimes it’s hooked up on pavement, but typically not. Keep in mind, if you’re hooking up on pavement, you’ve still got this piece of chalk. Here’s what I do. Draw a line. draw a line in the dirt with your toe put a rock down if you’d like whatever you need to do and here’s what i do i know where the edge of my truck is i leave the door open as i’m backing up to finalize this last little bit that i’m hooking up to the trailer and what i do is i look down at the ground i pick a spot on the truck i know my spot that’s on the pavement i know where a foot is And I know roughly how far I need to back up without ever looking behind me. In fact, I’m not looking at the trailer. I’m looking down at the ground to see how far am I traveling in the truck to know that I’m going to finally be in the center of things where I can then lower the trailer down on top of the ball. And again, I don’t know if somebody ever taught me that or if it’s something I just picked up over the years on my own, but it works extremely well. And you know exactly how far you need to back up at that point in time. And you’re going to be lined up almost every single time where all you do then is lower the trailer down and off you go. And I am not one. I am not one that believes in bringing the trailer to the truck. No, that’s not how this works. The truck goes to the trailer. We are not going to bust our back. We’re not lifting trailers up. We’re not trying to jockey things around. If you can’t go back there and basically take the screw jack that’s there to lift the front up, some are electric, some are a screw. You twist it one way or the other, usually counterclockwise to come back down, clockwise to go up. If you can’t go back there, turn that jack counterclockwise and lower it down on top of the ball, we have problems. Now, one other thing I should have mentioned prior to all of this. Before you back up and start hooking up, make sure the ball disconnect is in the quote-unquote unlocked or open position. We don’t want to back up and have things in the closed position. We want the trailer coupler to be in what I call the open position, unlocked. Meaning in some cases you pull a pin, you lift a lever, you slide. There’s several different types of these. You know which one you have. Utilize that correctly. Make sure that it’s open, ready to go. So we’ve now backed up. Oh, one thing I should have mentioned to begin with. Please, please, please, please. I’ve made this mistake. I’ve had employees make this mistake. We since have marked all of our balls and trailers in a way that this mistake doesn’t happen. But if you’ve got a 2-5-16 trailer, don’t put it on a 2-inch ball. If you’ve got a 2-inch trailer, don’t put it on a 1-7-8 ball. You get where I’m going here. Because guess what? You can have a 2-inch ball with a 2-5-16 coupler on the trailer. It’ll lower down, and it’ll tighten up, and it’ll act like it’s solid, but the first bump you hit, the trailer’s coming off. because it won’t be secure enough, because believe it or not, that 5 16ths of an inch is enough that there’s enough slop there, that trailer will jump off of the ball. So let’s double-check, too, to make sure that we’ve got the right ball with the right trailer. The ball mechanism, I should say, the hitch mechanism that’s on the trailer itself, it will be marked as to what size it is. It’s always right on top or on the side. It’ll tell you 1 7 8ths, 2, 2 5 16ths. Most of your heavier trailers are going to be 2 5 16ths. Most of your standard, even some car trailers and so on, will be 2-inch. It just depends on who built that trailer, what it’s rated for, and so on, as to whether it’s a 2-inch or a 2-5-16. So I should have said that to begin with. Let’s make sure we’ve got the right ball. for the right coupler that’s on the trailer. And if all of that is like it’s supposed to be, and one other thing too, let’s make sure that we’ve got, in most cases, people use adjustable ball mounts, they call it, that’s on the two inch receiver of the truck. Some of you have two and a half inch receivers, but let’s make sure that we’ve got the height correct as we’re coming back. Now, some of you are gonna say, John, how do I know that? Okay, well, first things first, typically when you took the trailer off, You’re looking at it, and you’re knowing, okay, I’ve got the nose of the trailer tilted up slightly so that as I hook up the next time, it comes back down on the ball. The truck’s going to squat just a little bit, and now I’m level. We don’t want to be nose up on the trailer. We don’t want to be nose down on the trailer. We want to be perfectly level with the truck across the board. Now, if anything, I may want to be a tad high on the trailer as opposed to down because as we load the trailer, The nose is going to come down, the truck’s going to squat a little bit, and I want to be level then. So if anything, err on the side of being a tad high on the trailer, but not too high. In other words, I don’t want to be way nose up on the trailer onto the ball mount of the truck. If that’s the case, we need a new ball mount. OK, just another thing. Hopefully you’ve hooked up your trailer and your truck enough to know exactly what your ball mount needs to be. But for a lot of you, myself included, you have enough different trailers where I use an adjustable ball mount. If I all of a sudden on the fly as I’m getting halfway lined up and I realize, oh, man, OK, I need to adjust my ball a little bit. I’ve got to go up or I’ve got to go down, then do so and do it at that time as everything is unhooked. We’re getting ready to hook up. Make sure that you’re leveling things up at that point and that point only. So that’s another one of those kind of quote-unquote takeaways. We want to make sure that everything is dialed in, and when we hook up, everything works. So we’re going to lower the trailer down. We’re going to make sure that everything’s all dialed in. We’re going to make sure everything’s all leveled up. As we go down, we want to make sure that our coupler attaches correctly. In other words, that thing should go down, and whatever you need to do to lock that ball down, to lock the coupler down, it should be easy. You should not have to force anything to get that coupler to stay locked. If you’re forcing it, we have a problem. It’s either all corroded. It’s gotten super rusty. As you had it stored, things weren’t lubricated, whatever. But we want that to be an easy process because we want everything to – because the way that works is there’s like a ramp mechanism that when you undo the coupler, it’s pulling that ramp back away from the ball, letting it release from the ball. And then when you hook everything back up, that ramp mechanism goes in, sits against the ball, and that’s what locks that coupler on. By the way, we want to make sure that all that is working properly, part of our walk-around maintenance and so on, so we’ve got everything all hooked up. We know that that thing is connected properly. Okay, then just like last week, we’re going to hook up our safety chains. We’re going to hook up our breakaway device, like I just said. And oh, by the way, please, please, please, I see this mistake all the time. Do not, I repeat, do not, Put your breakaway on your safety chain. That’s not how this works. The breakaway cable that I talked about a few minutes ago that energizes the trailer brakes if things come apart, that needs to go separately onto the truck with its own clevis into the same area, the same ring that we’re putting the safety chain on, but it is not hooked to a safety chain. That’s illegal, and it doesn’t work that way. It needs to be on, and oh, by the way, it doesn’t go on the pin for your ball mount either. I see so many people just take that cable, wrap it around the pin. Oh, we’re good enough. No, again, that’s not how this works. It should have its own clevis. It should go into the same area, one of the two holes. Usually it’s on the left-hand side, driver’s side. You want to put it onto the same hole. Trailer hitches have a hole where you can put your safety chains on. We want that mounted or we want that to be hooked to that hole separately from your safety chains. I see so many people. Make the mistake of just hooking that onto the safety chain or they just wrap it and wind it into the safety chain. Yeah, no, that’s not how this works. What if the safety chain breaks? What if the clevis broke off? What if you only used a hook like I talked about last week and you didn’t take care of that and put a clevis on instead? Bottom line, what if something happens there? All of a sudden, that breakaway is of no use at that point. We want that breakaway to work properly. That’s what it’s there for, so make sure it is. Okay, now we’ve got everything all hooked up. Lastly, after all this is done, plug in. Plug in the trailer. Let’s make sure that all of our lights and everything work properly on the trailer and the truck. And as I said last week, this is easy to do. Truck is now potentially still running. You’ve got everything hooked up. You’ve got the coupler down. The jack is up. Everything’s good to go. Now, go up, turn the left turn signal on. Walk back, is it working? Is the truck working? Is the trailer working? Now flip the right one on. Is the right one working? Now turn the headlights on. Do we have marker lights in our taillights on in the very back of the trailer? Now, somebody said, okay, John, well, that’s all great. How do you check brake lights? Well, rule of thumb is… that if you’ve got turn signals and you’ve got taillights, you’re probably going to have brake lights anyways, but that’s really easy. If you’re in an area where it’s especially a little bit dark or you can back up against a building or anything along those lines, if you’re alone and by yourself, just put on the brakes and you’ll see it light up. You can see the back of the trailer light up at that point. But if you’re alone and it’s really light outside and there’s nobody around, but you’ve got turn signals and you have taillights, I can pretty much guarantee you you’re going to have brake lights. There’s but few exceptions to where you’re not. You’re typically going to have them. Now, one other thing for some of you that have RVs and things like that where you’ve got a battery on the trailer that’s getting charged from the truck. Going back to my meter now that I talked about you should have bought earlier. We want to make sure that whatever the battery is on the RV, it’s getting charged, especially if you’ve had things sitting over the entire winter in this case. So as everything’s hooked up, the truck is running. We’ve got taillights, brake lights, turn signals, all of that. Go to wherever your battery’s at. Sometimes that’s mounted up on the frame of the trailer. Sometimes on an RV, it can be in a compartment. Sometimes it’s inside. You’ve got to lift a seat up or something inside the RV itself. But get to where your RV battery is. Take your meter. And it should be charging 13.2, 13.4, somewhere in that neighborhood. In other words, not 12. If it’s below 12, it needs to be above 12, by the way. If it’s below 12, it’s not charging. So it should be charging just like the truck is being charged. The alternator on the truck is now charging that battery. By the way, in most cases, not all, but in some cases, most cases it’s even charging that extra battery I talked about for the breakaway switch. Most trailers, that’s being charged off the truck. In some cases, they use a sealed battery, and it never gets charged. But typically, that’s getting charged as well, and you can usually check that also. So bottom line is we want to make sure that all of our power – is running through the coupler if you would you know the the the coupler that we plug in with the plug and and again because you haven’t used things typically all winter long and things happen wires get chewed rodents corrosion happens and so on we want to make sure that all of that is so here’s the other point i should have made to begin with this initial hookup after we haven’t done anything for an entire winter this isn’t a five minute thing We’re going to spend half hour to an hour hooking things up. So here’s my point with this. If you’ve got a friend, a spouse, anybody that’s going to be coming along with you for this, allow time and make sure everybody understands this is going to take a little time and I’m not leaving the space until I know I’ve got all my things taken care of. When it comes to the battery being charged on the RV, that is something you could drag home if it’s not charging and look at and so on, and we could work on that later. As long as everything else is functioning properly and we’re good to go, our brakes are working, our lights are on and so on, okay, you can drag that anywhere you want and then try to figure out why is the battery not charging. That could be a separate issue. But initially, really, go through all of this where it’s parked, and let’s make sure that everything is functioning properly before we continue on. And I can’t tell you over all of the years how many times somebody’s getting ready to leave. They’re heading out of town. They go inside and they flip their 12-volt switch to turn on lights. Nothing comes on. And they’re like, oh, great. Now what? That means either the battery’s dead, it’s not charging, something’s happening, and away we go. So we want to double-check all that before we take off. Now that we’re all hooked up, Everything’s working. We’ve got our coupler all positioned correctly. We’re done. Our safety chains are on. We’ve got our breakaway switch handled. Everything’s good to go there. Now, first things first, we did. Now the next thing. What’s the maintenance on the trailer been like up to this point? In other words, have you kept your log like you should when we’re wheel bearings packed? If this is a boat trailer, that needs done every year. If this is any other type of a trailer, I would say, depending upon the miles you use, this should at least be an every other or for sure every third year, depending upon how many miles you tow. I would really say every other year you ought to be looking at wheel bearings. Now, I am not, and I know some people are going to yell at me for this, I’m not a big fan of the buddy bearings, they’re called. where there’s a cap with a zerk at the end of it, and you literally fill it all up with, you know, wheel brain grease, chassis lube, whatever. I’m not a fan of those because I think that’s lazy. And in a lot of ways, you don’t know if the seals are even functioning properly. I’m one where you ought to just every other year or so pull the wheel off, pull the hub off, go ahead and make sure your wheel bearings are packed and this is another step and this this should be done again in in the same time frame make sure the brakes the electric brakes are adjusted properly now if you don’t know how that works have somebody that understands trailers do that for you it’s not that hard to figure out you can watch a video on this most likely and determine how to do it but make sure your trailer brakes are adjusted appropriately because if not they’re not going to function properly And depending upon the size of the trailer, the load that you’re hauling, you want trailer brakes, especially in our area. If you go up into the mountains at all and we’re going to come downhill, we want to make sure that our trailer brakes are working. I mean, we want trailer brakes working, period, no matter what. They’re there for a reason. Let’s make sure that they’re functioning properly and so on. Now, one last thing, and I talked about this a little bit last week. If you have a weight distribution hitch, again, pay attention. Make sure all that stuff is working properly. We’ve lubricated everything. You know how to adjust the torsion bars correctly. If you’re going to use a sway control, make sure that that’s on correctly. Again, both ends of it are lubricated and so on. Now, doing all of this also, this is messy. Okay, this is also something that you’re not doing in your church clothes. Okay, you’re going to get into grease. You’re liable to rub up against grease. Make sure you’re wearing either some coveralls or pants that you can get greasy and have either washed. And if they get messed up, it’s okay. Everything I’m talking about gets very dirty. Because in some cases, if something doesn’t work, guess what? You’re on the ground looking up underneath a trailer with your flashlight trying to determine what’s going on. And, guys, I’m talking from experience because these things happen. I mean, I… Trailers, by the way, I talked about this last week a little bit. How do you know you have a good trailer versus a bad trailer? Well, first of all, look at the reviews. I should have talked about this last week, but again, we were limited on time. How good is the trailer you’re buying? Go look at the reviews. Now, when it comes to RVs, believe it or not, There’s only a handful, at best, of manufacturers that are separate from one another. One company literally owns almost every single RV maker out there. And that’s the consolidation that’s happened in that world. And I’m not exaggerating when I say it. If you don’t believe me, look it up. Airstream, it’s on its own. There’s probably a couple of others that are made independently. But almost every single other brand of trailer out there is made by one company. It’s under one umbrella, meaning there’s not a lot of difference in how these things are built. You may get one that looks super, super fancy, and it’s way better than the one sitting next to it. But here’s the bottom line. They’re all the same. I’m not joking. They’re all made almost identical to one another. So this really does come down to look at the reviews, which one has better reviews versus another, and why. And in a lot of cases, crawl underneath the trailer. Do you see exposed wiring, or is everything enclosed? What do the wires look like that are going to the trailer brakes themselves? What are the axles and things look like? What kind of axles does it have? What’s the suspension look like? By the way, these are all things you should be looking at at the beginning of every year right now as to what are my axles looking like? Do I need to grease anything? Are there grease zirks on the springs themselves? Does this thing need a complete maintenance? And again, if you’ve got the ability to do this yourself, Great. If you don’t, find somebody that does and have these things done for you because they can go through this trailer and make sure everything’s all dialed in. Now, that’s on the RV side. How do you know if you buy a good utility trailer versus car trailer? Same thing. Go look at the reviews. In the trailer world, and I said this last week, and I mean this, there is a lot of really good, solid trailers that are made, and there is a ton of absolute junk that is made as well. And folks, I mean that sincerely. There literally is everything and everything in between when it comes to trailers and how they’re manufactured. Some are really, really, really solid, and some are literally absolute junk, garbage. They shouldn’t even be on the road. And I can tell you by towing a trailer how good it’s made versus how good it is not made. Some tow like a dream. You don’t even know what’s behind you. There are others that, I mean, they are pushing you all over the road. The axles aren’t straight. They’re not aligned correctly. They’re going to wear tires and so on. And, again, it really does come down to who built it, how well is it made, and there is a vast difference. And keep in mind that building trailers is not the same as building cars. They don’t have to meet the same type of safety specs and so on that car manufacturers do. It’s why there’s such a wide variety in the trailer world as to what’s good versus what isn’t good. One last thing before we continue on to the next segment. This has bit me before. So if it’s bit me, it can bite a lot of people. Are the tags current? Look at your tags on the trailer. Some things just slip through the cracks as far as renewals go. Are your trailer plates current? Because, by the way, one of the easiest things for State Patrol or anybody else to pull you over for is expired tags. It’s an easy hit for them. So make sure, pulling the thing out, that something didn’t slip through the cracks, you forgot to put the tag on, you don’t have the registration, whatever the case may be, make sure that that’s all dialed in. Now, I’m going to give you one tip on the registration side and where to keep that when I come back here in a moment. I’ve got to take a break. Listen up to our sponsors. We appreciate them. They’re the ones that make this happen on a regular basis. Don’t forget, you’re listening to Drive Radio, the Extra Mile, heard right here on KLZ 560.
SPEAKER 05 :
If you’re new to the area, our Napa Auto Care Center would like to extend a hearty welcome. We’d like to introduce you to our top quality vehicle maintenance and repairs, nationwide warranty, and service you can trust. Stop by our Napa Auto Care Center for your special welcome kit. It has the information you need to get to know us, plus welcome specials to save you money from the very start. Visit NapaOnline.com.
SPEAKER 01 :
Now is a great time to take advantage of Geno’s Auto’s best discount of the year. Save up to $50 on servicing your vehicle. Mother Nature is starting our warm season prematurely, and it’s a good time to prep your vehicle for an early summer. Cooling system maintenance, your radiator, hoses, and belts combine to keep your vehicle cool when it’s hot outside. The refrigerant in your air conditioning system gets contaminants, evaporates, and breaks down over time. That refrigerant needs to be able to absorb heat to be able to cool your vehicle’s interior. Geno’s is celebrating over 43 years in business serving Littleton, Colorado. We invite you to check out all our Google reviews. We offer loaner vehicles so you can drop your car off and pick up when ready. Save up to $50 on servicing your vehicle now through the end of the month. Give us a call or go online to schedule an appointment. Geno’s is AAA approved and located at Bowles and Platt Canyon. Stop in or visit us online at genosautoservice.com.
SPEAKER 06 :
This program was recorded earlier for broadcast at this time. No phone calls can be accepted.
SPEAKER 02 :
All right, welcome back. Drive Radio, The Extra Mile, KLZ 560, 3 to 4 p.m. every Saturday. Don’t forget, you can text us any question or comments or anything you’d like us to talk about in this Extra Mile program, 307-200-8222. And don’t forget the website, drive-radio.com. Now, trailer registrations. And everybody does this differently, I know. I guess for me being a fleet operator, and I do this even for my own trailers I have at home, they make a trailer registration holder That is waterproof, mounts to the side of the frame. It’s the best place to keep your registration. It’s safe. It’s secure. No one’s going to bother it there. You can mount it to the inside of the frame, outside of the frame. Just make sure it’s in an area where you’re not going to have rocks and crud and things like that and knock it off. But they make these things. They’re sold all over the place. You can get them on Amazon. That’s the best place to store the registration. And I say that because it’s always there that way. If you loan your trailer out, the next person has the registration. Don’t put it in the glove box of the truck. Because what if you tow it with a different truck? What if somebody else borrows the trailer? Now, I’ve known a lot of people in the past where you can actually tape the registration to the back of the license plate. The problem there is now you’ve got to take the license plate off to show to the officer that, yes, in fact, I’ve got the registration. It’s easier to buy these registration holders. And by the way, if you have separate insurance on the trailer, which some do, you could even put that in the same area. They’ll hold a couple of different documents. You fold them up. I’m talking about a round, circular, disc-type, sealed unit that these things go into that’s all waterproof that’s about three inches in diameter. Three inches across. Worked perfect. So a really great way to hold your registration. So we’ve already got the trailer hooked up. We’ve got everything dialed in. We know we’ve got everything maintenanced as well as it should be. Every single time you hook up throughout the rest of the summer, you’re still going to do the walk around I talked about. Now, I haven’t talked about the truck side. I kind of figure that’s a given. We talk enough about trucks on drive radio and so on. I haven’t talked about the hitch mechanism on the truck. That’s kind of a given. It’s on its own. I didn’t talk about the ball mount either. I kind of figure that’s on its own as well. And here’s something else when it comes to just really quick on the ball mount. Yeah. use a good quality ball mount. There is a lot of Chinese junk out there when it comes to ball mounts. Keep in mind, you’ve got, in some cases, a heavy RV-type trailer that’s behind you. You’ve got, in some cases, a classic car that you’re hauling around on that trailer that’s behind you. In other words, you have a lot of value in what’s behind you. Why save $100 on a ball mount or $50 on a ball mount? When you could buy a really good solid one that maybe, yeah, maybe it’s $100 more money, but in the grand scheme of things, is it? I like the BW brand, by the way. A lot of you, there’s other brands on the market as well. I’m not endorsing them. It just happens to be the brand that I sold back in the day and I still use today, and I like them. They do a really good job. Okay. On an RV. This is an enclosed RV. Fifth wheel or a bumper pull. Next thing to do, let’s look inside the RV. This is part of your maintenance. Do you see any leaks? This thing, in a lot of cases, sat out in storage, whether that be next to your house at home, whether that be out in an RV lot, snow, rain, and so on. Do you have any leaks? Do you see any part of the roof whereby a leak looks like it’s occurred? You can tell when there’s a leak. Do you have any? Next step is, what do we do to fix that? Is there some leaks around the skylight? Are they leaking around a window? Double-check everything to make sure everything’s good. Now, a lot of guys will get on the roof of their RV and do these checks. I don’t like walking on the roof unless you have to. I kind of just feel like that’s just adding extra strain and stress to the system that’s there, and if you don’t have to, don’t. Yeah. Yeah. Once you get things back to where you’re going to be at home or you’re staging to go on your trip or whatever, this is where you would also plug into 110 or in some cases it’s 240 or sorry, 120 or 240, depending upon your situation. But plug in, unhook your plug from the truck. Does everything still work? In other words, is the inverter working? Is your battery being charged at that point? Going back to the meter I talked about, do the lights come on? Is the refrigerator operating like I talked about earlier? Does the water get hot, I should say? Are all those things functioning properly? Is the water pump working? Those are all things you can do once you get things back home and stage, and again, allowing for enough time. I can’t tell you how many people. It’s Memorial Day, and they’re going to leave Friday, and they only drag the trailer out on Thursday. What if we have a problem? You know, I don’t care if it’s brand new. What if we have a problem? Is that going to get fixed by Friday? You know, probably not. So plan ahead in some cases. And I know people will do this because I see them going up and down I-70 and the like. Drag that thing out two or three weeks in advance. I know you can’t keep it at your home that long based upon, you know, city laws and covenants and HOAs and so on. But drag that thing out a few weeks early and make sure things work properly. do some of the things that i just mentioned on the front side to make sure we don’t have any problems the other thing you’re going to do of course is a lot of you winterize that rv you put the pink antifreeze in we want to make sure we flush all that out we fill it up full of water we don’t have any brakes anywhere nothing got frozen is our tanks okay as far as our wastewater is concerned is all of that working like it’s supposed to on an rv And this is true, by the way, whether it’s a camper you’re putting on the back of the truck and it’s got its own self-enclosed toilet and shower and so on, all the way to the full fifth wheel that’s got, you know, storage capacity and a toy hauler in the back and, and, and. Double check, make sure all of these things are working properly. All of your electrical is good. The battery is up. Your inverter is working the way it’s supposed to. Some of you will even have air conditioning units on your unit. In some cases, you’ve got to be plugged into 240 to make that work. Double check all of that. We call that shore power. Make sure your shore power is working correctly. Now, some of you also have units that are big enough. There’s a generator on board. Some of you even have car haulers and such that have a generator on board. Service it. That’s an annual thing. Service it. Change oil. Some of them will have an oil filter itself depending upon the size of the generator. We’re going to go through and service it and make sure that everything is working properly along those lines. So once all of that’s done and we’ve got all that handled, just another one of those maintenance things you need to take care of because some of you will run that generator. The other thing, too, if that generator runs your AC system, unhook from shore power, turn on your generator, make sure things are working correctly, everything is fueled up correctly, you’ve got good gas, and it’ll run those things as well. Some of you that have car haulers, you’re running compressors and other things as well. Run everything. Check everything out to make sure that everything as we head into this stretch of summer is working the way it’s supposed to. Now, one other thing you need to be doing once we’re back home as well, do we have a spare tire? Is it inflated properly? Do we know how to get to it? Do we have the right four-way or tire iron or whatever we need to in case we have a problem, we can get that tire changed? Do we have a jack capable of lifting the trailer up? Do we have built-in jacks or do we need an additional jack? Do we have a bottle jack? What do we need if we have a problem on the side of the road that we know we can get fixed and back in line? And we do that as quickly as we possibly can. Now, I’m not going to get into what tool kits you should own or not own. Some of these are in my notes, but you guys know what you need. You know what you need as far as wheel chocks, extra fuses, of course, grease. Now, one thing I will tell you that I think everybody should carry, just personally speaking, if you’re going to be towing a trailer and doing the things you do, and they’re so cheap anymore, buy a tire plug kit and learn how to use it. If you need to go get an old crappy tire from, you know, by the way, tire stores have tires all over the place. If you need to say, hey, I want an old tire. Can I have it for a day or two? They’ll give it to you. You can bring it back. They don’t care. They’re not going to do anything with it. Take that old tire home, get a drill out, drill a hole in it, and learn how to put a plug in. It’s not that hard. And my point with this is there’s a lot of things on the side of the road that in some cases don’t even need changed. If you’ve got a tire plug kit, you could plug the tire, fill it back up with air with your portable compressor, which you should always have with you anyways. And there’s several different makes and models out there. I’m not going to get into that. I talk about that on some of my other programs. In a lot of cases, you could plug the tire, fill it back up with air, never have to change it, and off you go. Now, where it’s nice to have a jack is maybe that plug or that hole is in a spot that you need to rotate the tire a little bit. Put your jack, bottle jack, whatever it is you need to do underneath the axle, raise it up, spin the tire around so we can get to it more easily. Put your tire plug in, fill it back up with air, and off you go. Now, if you’ve shredded a tire completely, you’re going to need to put a spare on. i’ve seen it happen this kind of goes back to that initial walk around and how good were those tires to begin with okay and and how you know how weather checked were they and so on now keep in mind too that once we get the thing home i want you looking at the insides of those tires as well much easier to do that at home concrete asphalt and so on but but again take that flashlight run underneath the entire frame of the trailer make sure everything’s dialed in and so on now Again, if we have a breakdown, how are you going to fix that? What kind of a toolkit do you have with you? Now, it’s funny. We don’t really need a toolkit much more for vehicles. I talk about that every week. Vehicles have gotten to the point where they’re so solid and, frankly, if you have a problem, you’re not fixing them on the side of the road anyways. But trailers are different. You should have, right off the top, some wire. Some mechanics wire, so regular type wire, electric wire, I mean. Some mechanics wire, you know, baling wire, they used to call it. Not twine, but actual wire. You should have a test light to know whether juice is flowing or not, or your voltmeter, like I talked about earlier. Some extra fuses. You know what you’ve got in the trailer and what kind of fuses you might actually need. Grease, of course, you need to lubricate things up, penetrating oil and the like. I talked about the tire repair kit. Some good pliers. Channel locks, by the way, work great. And some wire pliers, of course. A small screwdriver in case you’ve got to take the trailer plug apart. So, you know, a pocket screwdriver. Usually they’re a straight or a Phillips. Have both, by the way. then on top of that making sure you have enough capability with either four ways or tire irons or whatever to make sure that you can actually get the tire and wheel off and again this is where the penetrating oil that you again just carry this with you for some of you that are rvs you can stick this in a drawer or a storage compartment in the rv itself those of you that have other types of utility trailers and so on they make all sorts of little boxes that you can mount on the frame of the trailer you can throw this stuff in the truck as well you know you pick your poison do whatever you want to do when it’s all said and done but bottom line uh you have what you need in case you have any kind of a breakdown on the side of the road and by the way any of you that have towed anything for any length of time if you haven’t had a breakdown congratulations i have In fact, the only side of the road breakdowns, and I’m not lying in this. I’ve been driving since I was 16 years of age. I’m 61. Do the math. The only side of the road breakdown I’ve ever had is a trailer in all these years. I’ve never had an actual vehicle breakdown, but I’ve had many a trailer breakdown. Light’s not working. Trailer brake’s not working. Oh, one other thing, too, I wanted to mention. Those of you that are going to haul things on either a utility trailer or a car trailer, how are you strapping your things down? What’s your tie-downs look like? Are they solid? Have they been sitting around so long that they’ve become old and dry rotted and so on? If you need to upgrade any of those things, again, now is the time to make sure all that stuff gets handled. Now, keeping that log on the trailer and knowing what we’re doing as far as our maintenance is concerned, and I haven’t even talked about boat trailers and what you need to do there. They’re kind of an animal of its own. You need to be servicing those wheel bearings every single solid year, no matter what, because that boat trailer is going in the water so much. And again, there’s so many different trailer configurations out there. Some of you guys do snowmobiling. Some of you do ATVing or RTVing and you’ve got trailers for that. Some of you have got motorcycle trailers. Guys, I can go down the list. There are so many of them. now one thing i should have mentioned earlier when it comes to changing wheel bearing grease if you’ve got a small utility trailer that’s running a very small tire sometimes they’re 12 inches even annually wheel bearing service annually if you think about how fast that wheel is spinning versus a 16 or 18 inch wheel huge difference in some cases depending on the size of the trailer a 19 inch wheel on some of the larger trailers If you think about the difference in how fast that one is spinning and how much hotter those bearings are getting versus some of the larger ones, you’ll understand why I’m saying service those annually, no matter what. So it’s interesting. Some of the smaller trailers actually need more wheel bearing service than larger ones do because of how fast that tire is spinning. This is true, by the way, with pop-up campers. Pop-up campers typically have a very small tire-wheel combination because of the way it’s made. They need serviced annually. Okay. Now, everything I’m talking about, by the way, these are things you won’t hear from the trailer salesperson. And I’ve never, I don’t know why, but I’ve never gone to the trailer manufacturer and downloaded what they require you to do when it comes to servicing that trailer. I’ve always just done this stuff on my own because of being in the industry and growing up around it and knowing what to do and how to handle trailers and so on. I’ve honestly… i’ve never gone and looked at the manufacturer’s website i just sort of know based upon that tire size on the trailer how often is it towed where does it go are we in a lot of moisture or not i mean all those things factor into how often you’re going to service some of these things on the trailer itself and i go back to this as well how good is the trailer in the first place if it’s a really good high quality high manufactured you know highly highly manufactured trailer your maintenance is less If it’s a, what I would almost call a home-built trailer that you wonder how it ever made it onto the road itself, it’s going to require more maintenance. It just is what it is. All right, before I close out, Luke, any questions?
SPEAKER 03 :
Yeah, a quick question. You take your car’s, let’s say you want to do maintenance on your car. You take your car to a car shop, a mechanic, whatever. I don’t see a whole lot of spaces for trailers.
SPEAKER 02 :
Do those exist? They are typically serviced by RV or trailer dealers that also do service work, and you just hit on a big topic, something I probably could dedicate a show to. You have to call around. Most mechanical shops do not work on trailers. Some of the off-road shops, like what I used to have, we did because we did enough of both that we took care of trailers and so on. Great question, Luke. So, yeah, for those of you listening… I don’t have anybody in my group, my network, that works on trailers other than Legacy up in Boulder. Outside of that, no one does. It’s very limited. You have to shop around, look at reviews, find out who’s good, who has somebody really well established that works on them to do what Luke just said. So, guys, that’s the end of Part 2. I don’t think we need Part 3. If we do, I’ll come back and do a Part 3, but I think we did enough with Part 2. Any questions at all, send me a text, 307-200-8222. This is Drive Radio, The Extra Mile, right here on KLZ 560.